Monday, February 24, 2014
TRIAL AND ERROR deco vanity and stool
The final post regarding the projects 6 lovely ladies and I did during
a workshop we had was on this fun Deco Vanity.

While buying another item at a yard sale George and I were approached by a neighbor
asking if we would be interested in a dresser he had.

So off George went to investigate while I finished loading the van.
Needless to say his vanity come home with us.

I showed the ladies how I apply appliques with finishing nails and glue and
I repaired one of the drawers with more glue and a couple of clamps.

We discussed different repairs that could be done to damaged veneer,
as we did have some lifting in areas of this vanity.
I showed them how I fill hardware holes to make way for new handles.
Tutorial can be found here

Everyone got to try the Rustoleum trigger spray can when
we painted the new hardware in oil rubbed bronze.

They all got a little tip how I position new hardware without a measuring tape.

5 of the ladies brush paint the vanity while Sonja painted the mirror frame.
I couldnt believe time flew so fast it was now 3 oclock and the class was over.
We chatted a little and went over a few more questions before everyone left.

I started working on the vanity later that evening and over the next week got it finished.
I know the ladies are eager to see the finished results and I have been very excited to show them as well.
I titled this post TRIAL AND ERROR because many of the initial things we started with
changed over the course of the week.

The hardware changed again to complement all the curves ...


The interior got stripped and stained dark brown ...

The cabinet was heavily distressed to show the details in the veneer and the black trim ...

And that brings us here ...

I just adore this piece and after all the waxing and poly the finish is so smooth and soft,
but I felt it was still missing something.

HERE

I had this little round side table hanging around waiting for a new purpose.

After painting and distressing,
I bought some great fabric, some foam, and started upholstering.
I may even still add some button tufting.

I trimmed her legs by 6 inches and added new nylon feet

Now shes perfectly chic!
Ive heard from most of the ladies thru the week.
All have been buying supplies and starting projects at home.
Now we just need them to send pictures on how their projects are going.
NO PRESSURE LADIES!
The other projects we worked and can be found here:
THE INQUISITOR, HER ASSISTANT, AND UPHOLSTERS WIFE
and
A NEWBIE, A MOOM WITH MAD SKILLS, AND THE PHOTOGRAPHER
Sharing with:


DECO DESK

Labour day has come and gone and our sunshine did the same.
I was able to get 5 pieces painted in the nice weather over the weekend.
One of the pieces was this cute little deco desk.

I sprayed it with a 50% - 50% ASCP mix of Old White & Pure White.
and lightly edge distressed it before hand waxing.


I filled the original holes on the six drawers so I could pick what ever size of fancy handles I wanted.
The desk was all finished but the drawers had to dry over night. I was so anxious to pick
the handles I pulled a whole basket from my stash and spread it out on the bed.
Of course when George comes to bed there has to be something said,
"what is going on here" and he emphasises it like Scott from The Canadian Pickers.
Before you know it I have him helping me chose the right handles for the project.
The knob on the middle drawer is a new piece, its a fun acrylic bead and rhinestone knob.
I dont think you can tell from the photos but it is quite large and really pretty.

The handles were salvaged from the dresser vrs. vehicle grudge match earlier this year.

For those who didnt get to read that story:
http://blogspot.ca/2013/05/how-to-demolish-dresser-with-vehicle.html

I used this little project to write a tutorial on how to install handles without a tape measure.
That article is currently being written so watch for it soon.

If you need some shabby chic white hardware stop into the FirstFinds Etsy shop.
We have some fun misfit handle sets to choose from and a large selection of
outlet and light switch plates plus tons more.
https://www.etsy.com/ca/shop/Firstfinds


Poplar Offereing Table
There is a small church next door to my shop and the pastor asked me if I could make them a simple offering table with a couple of drawers in it. I said sure! My first paying job, although it didnt really pay anything just materials since I am pretty new at this stuff.
Anyways, here is how it turned out, this is the first time I have ever really built drawers into a piece and I think they came out great. They are just on some wooden slides that I fabricated since the chuch didnt want to spend much money at all.


The poplar was great to work with and so is my kreg pockethole jig system. It was used to joint pretty much every piece on this table, although you would never know just looking at the table normally.
Read More..
Anyways, here is how it turned out, this is the first time I have ever really built drawers into a piece and I think they came out great. They are just on some wooden slides that I fabricated since the chuch didnt want to spend much money at all.
The poplar was great to work with and so is my kreg pockethole jig system. It was used to joint pretty much every piece on this table, although you would never know just looking at the table normally.
Shop Vac as a dust collector
Currenty in my ever evolving shop I am using a 12 gallon shop vac as my only means of dust collection. It works on some machines pretty well: my sander, miter saw, Kreg Jig, and router table. I cant hook it up to my table saw yet or my skil saw which I have been using to rip panels of MDF the past couple of days (which is working pretty well!).
I cant hook it up to my table saw because the dust port is larger than the hose on the vac, probably 4" when the hose is probably 2 1/2"-3". I checked at my local Lowes but I was unable to find a converter that would work. I havent really tried to hard to jerry-rig some sort of setup. My Dewalt skill saw just doesnt have anywhere to attatch a vaccuumm hose.
A bigger problem is the fact that the filter on the shop vac gets clogged and the vacuums suction power deminishes. I have been looking online at the Onieda Dust Deputy system. Basically its a 5 gallon bucket with a funnel on top that removes the particles and suposedly most of the dust that clogs up the filter.

The Dust Deputy
I have read reviews online and people have given the Dust Deputy pretty good remarks, so I guess I will give it a try. If it works it should be worth the money!
Read More..
I cant hook it up to my table saw because the dust port is larger than the hose on the vac, probably 4" when the hose is probably 2 1/2"-3". I checked at my local Lowes but I was unable to find a converter that would work. I havent really tried to hard to jerry-rig some sort of setup. My Dewalt skill saw just doesnt have anywhere to attatch a vaccuumm hose.
A bigger problem is the fact that the filter on the shop vac gets clogged and the vacuums suction power deminishes. I have been looking online at the Onieda Dust Deputy system. Basically its a 5 gallon bucket with a funnel on top that removes the particles and suposedly most of the dust that clogs up the filter.
The Dust Deputy
I have read reviews online and people have given the Dust Deputy pretty good remarks, so I guess I will give it a try. If it works it should be worth the money!
Sunday, February 23, 2014
FIXING DRAWER STOPS

While I was working on this pretty two color dresser I discovered all the drawer stops were missing.
This meant the drawers would push too far inside the body. In place of some of the stops I found
nails bent over, apparently this does the job but I can see trouble brewing leaving these behind.

I removed the nails and I went and found a paint stir stick and started to cut it up into 1" long pieces.
Each drawer would need 2 stops and this dresser had 5 drawers making that 10 total. I used my Anvil
Cut tool from Home Hardware (Canadian) it has a sharp knife blade that cuts through thin wood.

A dab of wood glue where the stop needs to go and press it into place. If you have clamps to hold
them while drying that would be best. You can also use some masking tape to hold them in place.


You can find a bit more info in another article I wrote about making drawer stops here:
http://blogspot.ca/2011/03/stop-drawer-stop-tutorial.html

HAPPY FIXING!
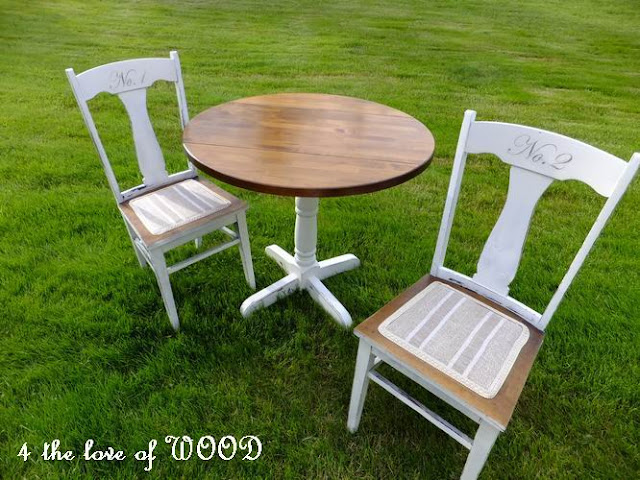
EDWARDIAN SCRIPT table for two
The weather was wonderful and warm
so I decided to do the photo shoot outdoors for you on this one.

This little table was an auction buy and quite a simple redo once I decided to
keep the lovely wood top.
The chairs were orphaned and the natural wood on the seats go nicely with the table.
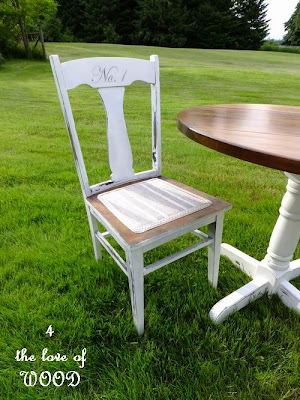

The seats are upholstered in a heavy weight woven linen with stripping


and the chairs backs are each numbered with Edwardian script.
Sharing with: